
Editing Tools I Use All The Time
In this blog, I will share five editing tools that I frequently use. I will also delve into how and why each tool is used, as well as the effects I aim to achieve with them. Of course, these are not the only tools I use; they are simply the ones I seem to rely on for almost every edit.

Tone Curve
The tone curve can be complicated yet immensely powerful. You can adjust an infinite number of exposure and colour aspects, but it’s also easy to overdo it. Personally, I don’t use it for colour grading; instead, I use it to create a custom contrast curve and adjust the black/white points.

The first thing I do is create between three and five points on the curve and then proceed to make a very slight S-curve. After that, I raise the blacks and lower the whites. This ensures that there are no pure black or white pixels in the photo, thus creating a softer, more film-like look. How far you push these adjustments depends on the specific photo and your taste, but I suggest exercising caution because it’s easy to overdo this and end up with a look reminiscent of an Instagram filter from 2015. The next step is to make fine adjustments to the control points to achieve the desired effect.


Clarity
Clarity is an amazing tool you can use to draw attention to specific details, exaggerate features, and create drama. It can also be used to smooth out the shot and create a dream-like effect. As always, caution is needed because this tool can single-handedly ruin your photo edit.

Personally, I use a global negative clarity of around -15 because I find the files from my Fuji system to be a little on the sharp side. On other cameras, like the Sony A7IV, I had to use around -20, if not more, because those files were even sharper. This is, of course, a matter of personal taste, and many may not understand why I prefer softer photos—and that’s okay. Even reducing it to around -5 can be enough to take the digital edge off the file.

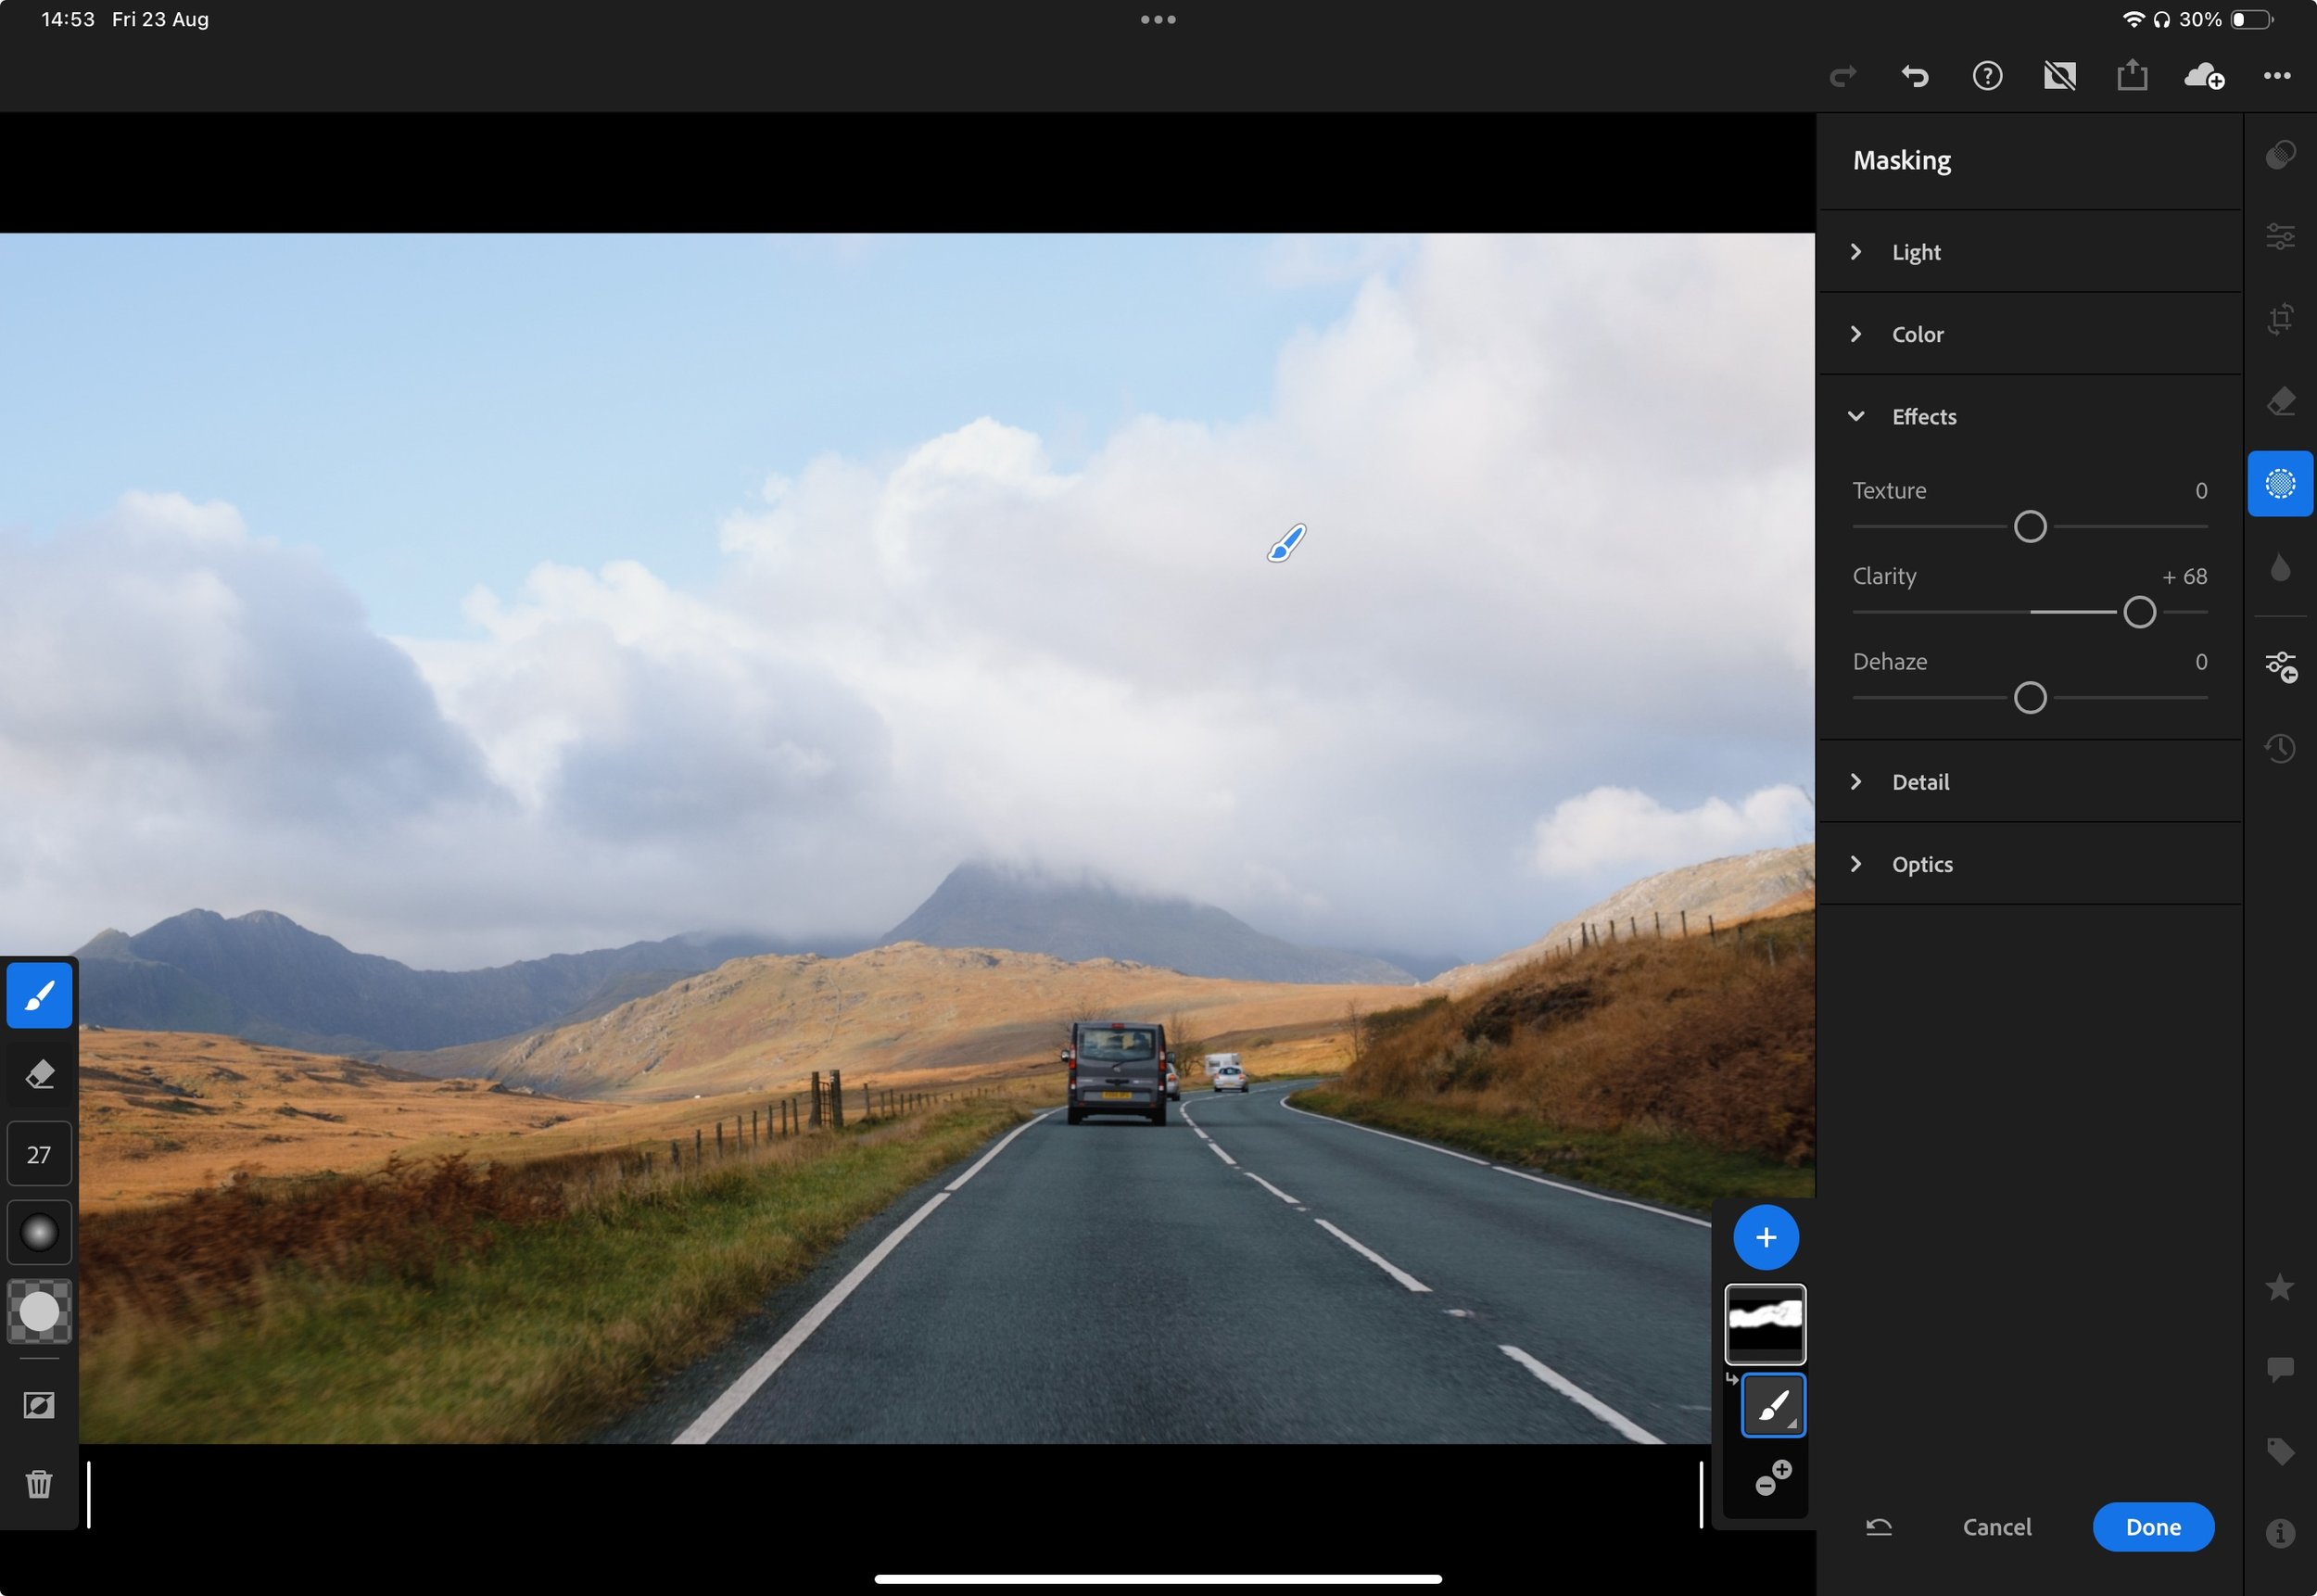
I would then study the image and identify which areas need more definition and attention, such as clouds, textures, or surfaces. I would use a local brush adjustment to brush clarity back into those areas, setting it to around +5 to +20, depending on the image. This allows me to maintain an overall soft image without losing detail where it matters.


Grain
This might be the most subjective part of this blog because some people love grain, while others wonder why anyone would actively degrade an image. Personally, I like to add grain because it softens the image, hides insignificant details, and adds a certain quality to the photo that I find difficult to articulate. As cheesy as it sounds, adding grain (tastefully) feels like seasoning a nice meal.
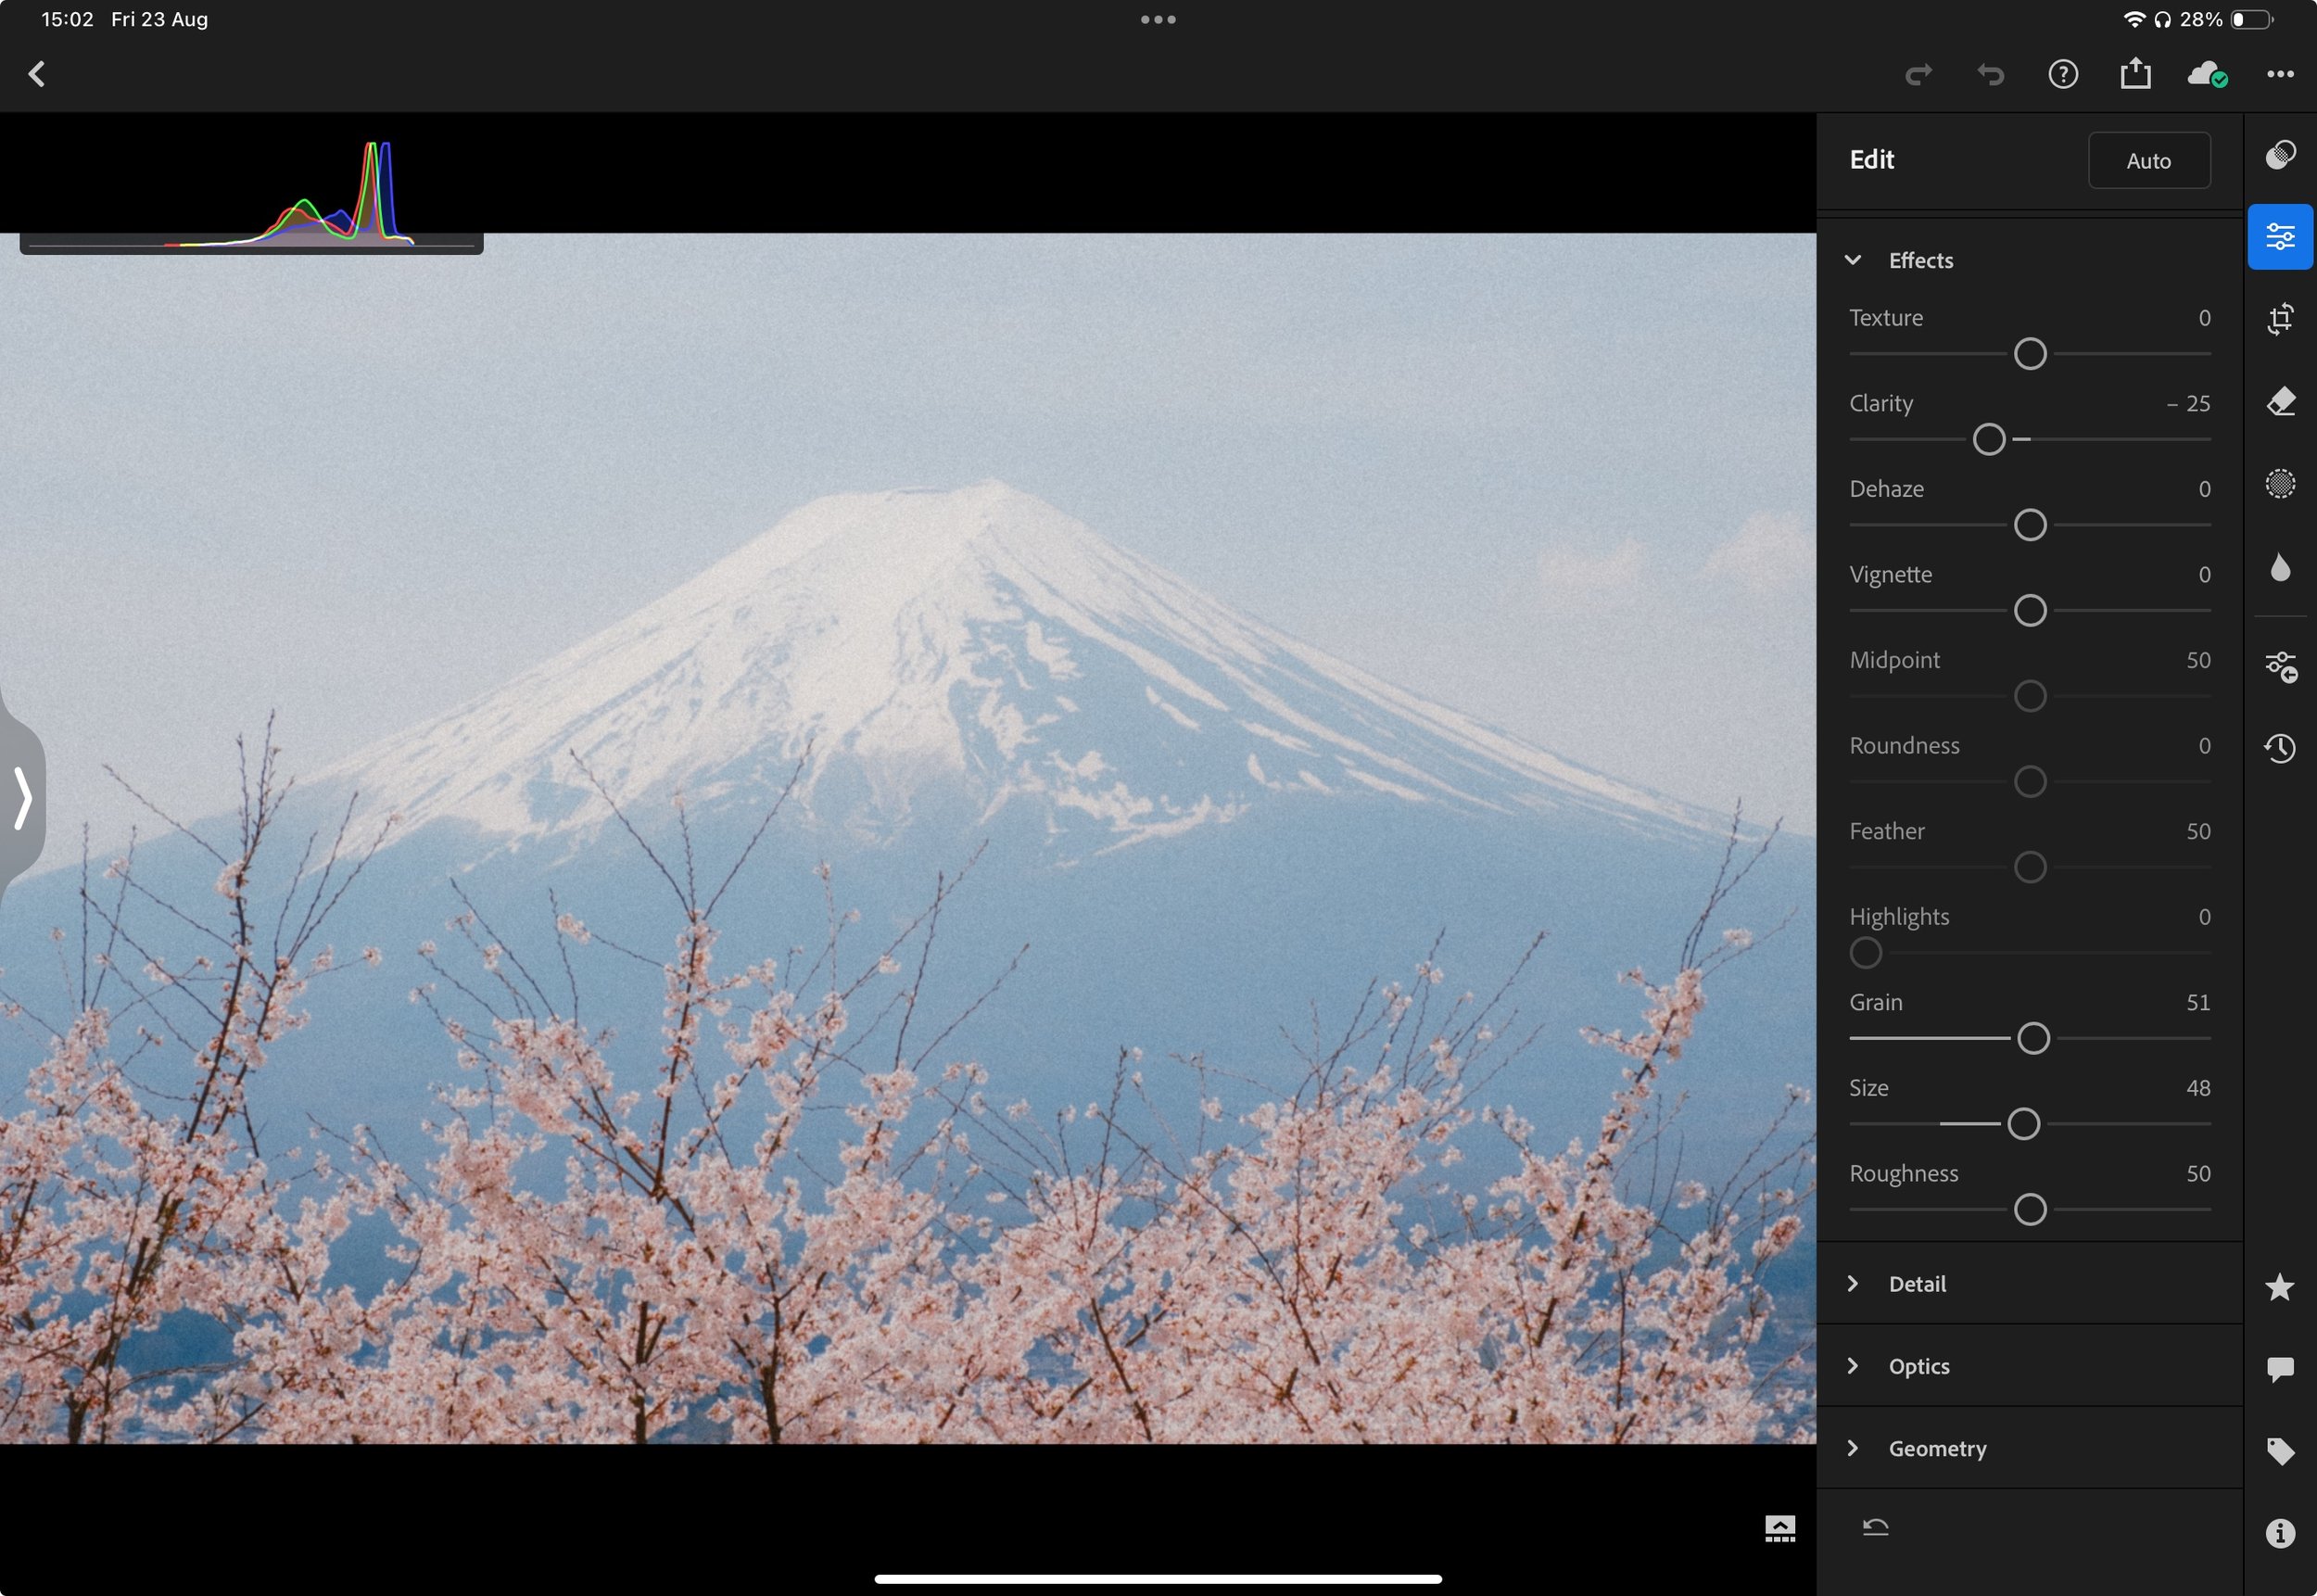
In most cases, I set grain and size to 25, while leaving roughness at the default setting. Sometimes, if I want to really exaggerate it, I will set grain and size to 50. There is no strict rule here—it ultimately depends on your taste, the image, and where it will be shared. For example, for social media, you might need to boost the grain, while for printing, you might need to scale it back.


Local Adjustment
More often than not, global editing is not enough to achieve the desired result. Perhaps having the correct global exposure means that some highlights are blown out, or maybe the hue/saturation combo that looks amazing for the background also ruins the skin tones. This is where local adjustments come in.

They can be applied in several different ways, such as radial filters, gradients, exposure masks, colour selection, subject detection, or even by brushing them in. The method you choose will depend entirely on what you want to achieve and the image you’re working with. Personally, my most used tools are radial filters and a simple brush.


Clone & Heal
The final tool I almost always use is the clone/heal/remove tool. I generally use this to remove distractions, rubbish, reflections, or anything that either shouldn’t be there or detracts from the photo.

n many cases, removing chewing gum, cigarette butts, stray reflections, or an empty crisp packet from the image can clean it up significantly and make a huge difference. Similarly, you can use this tool to remove stray branches or other elements intruding into the corners of the frame.
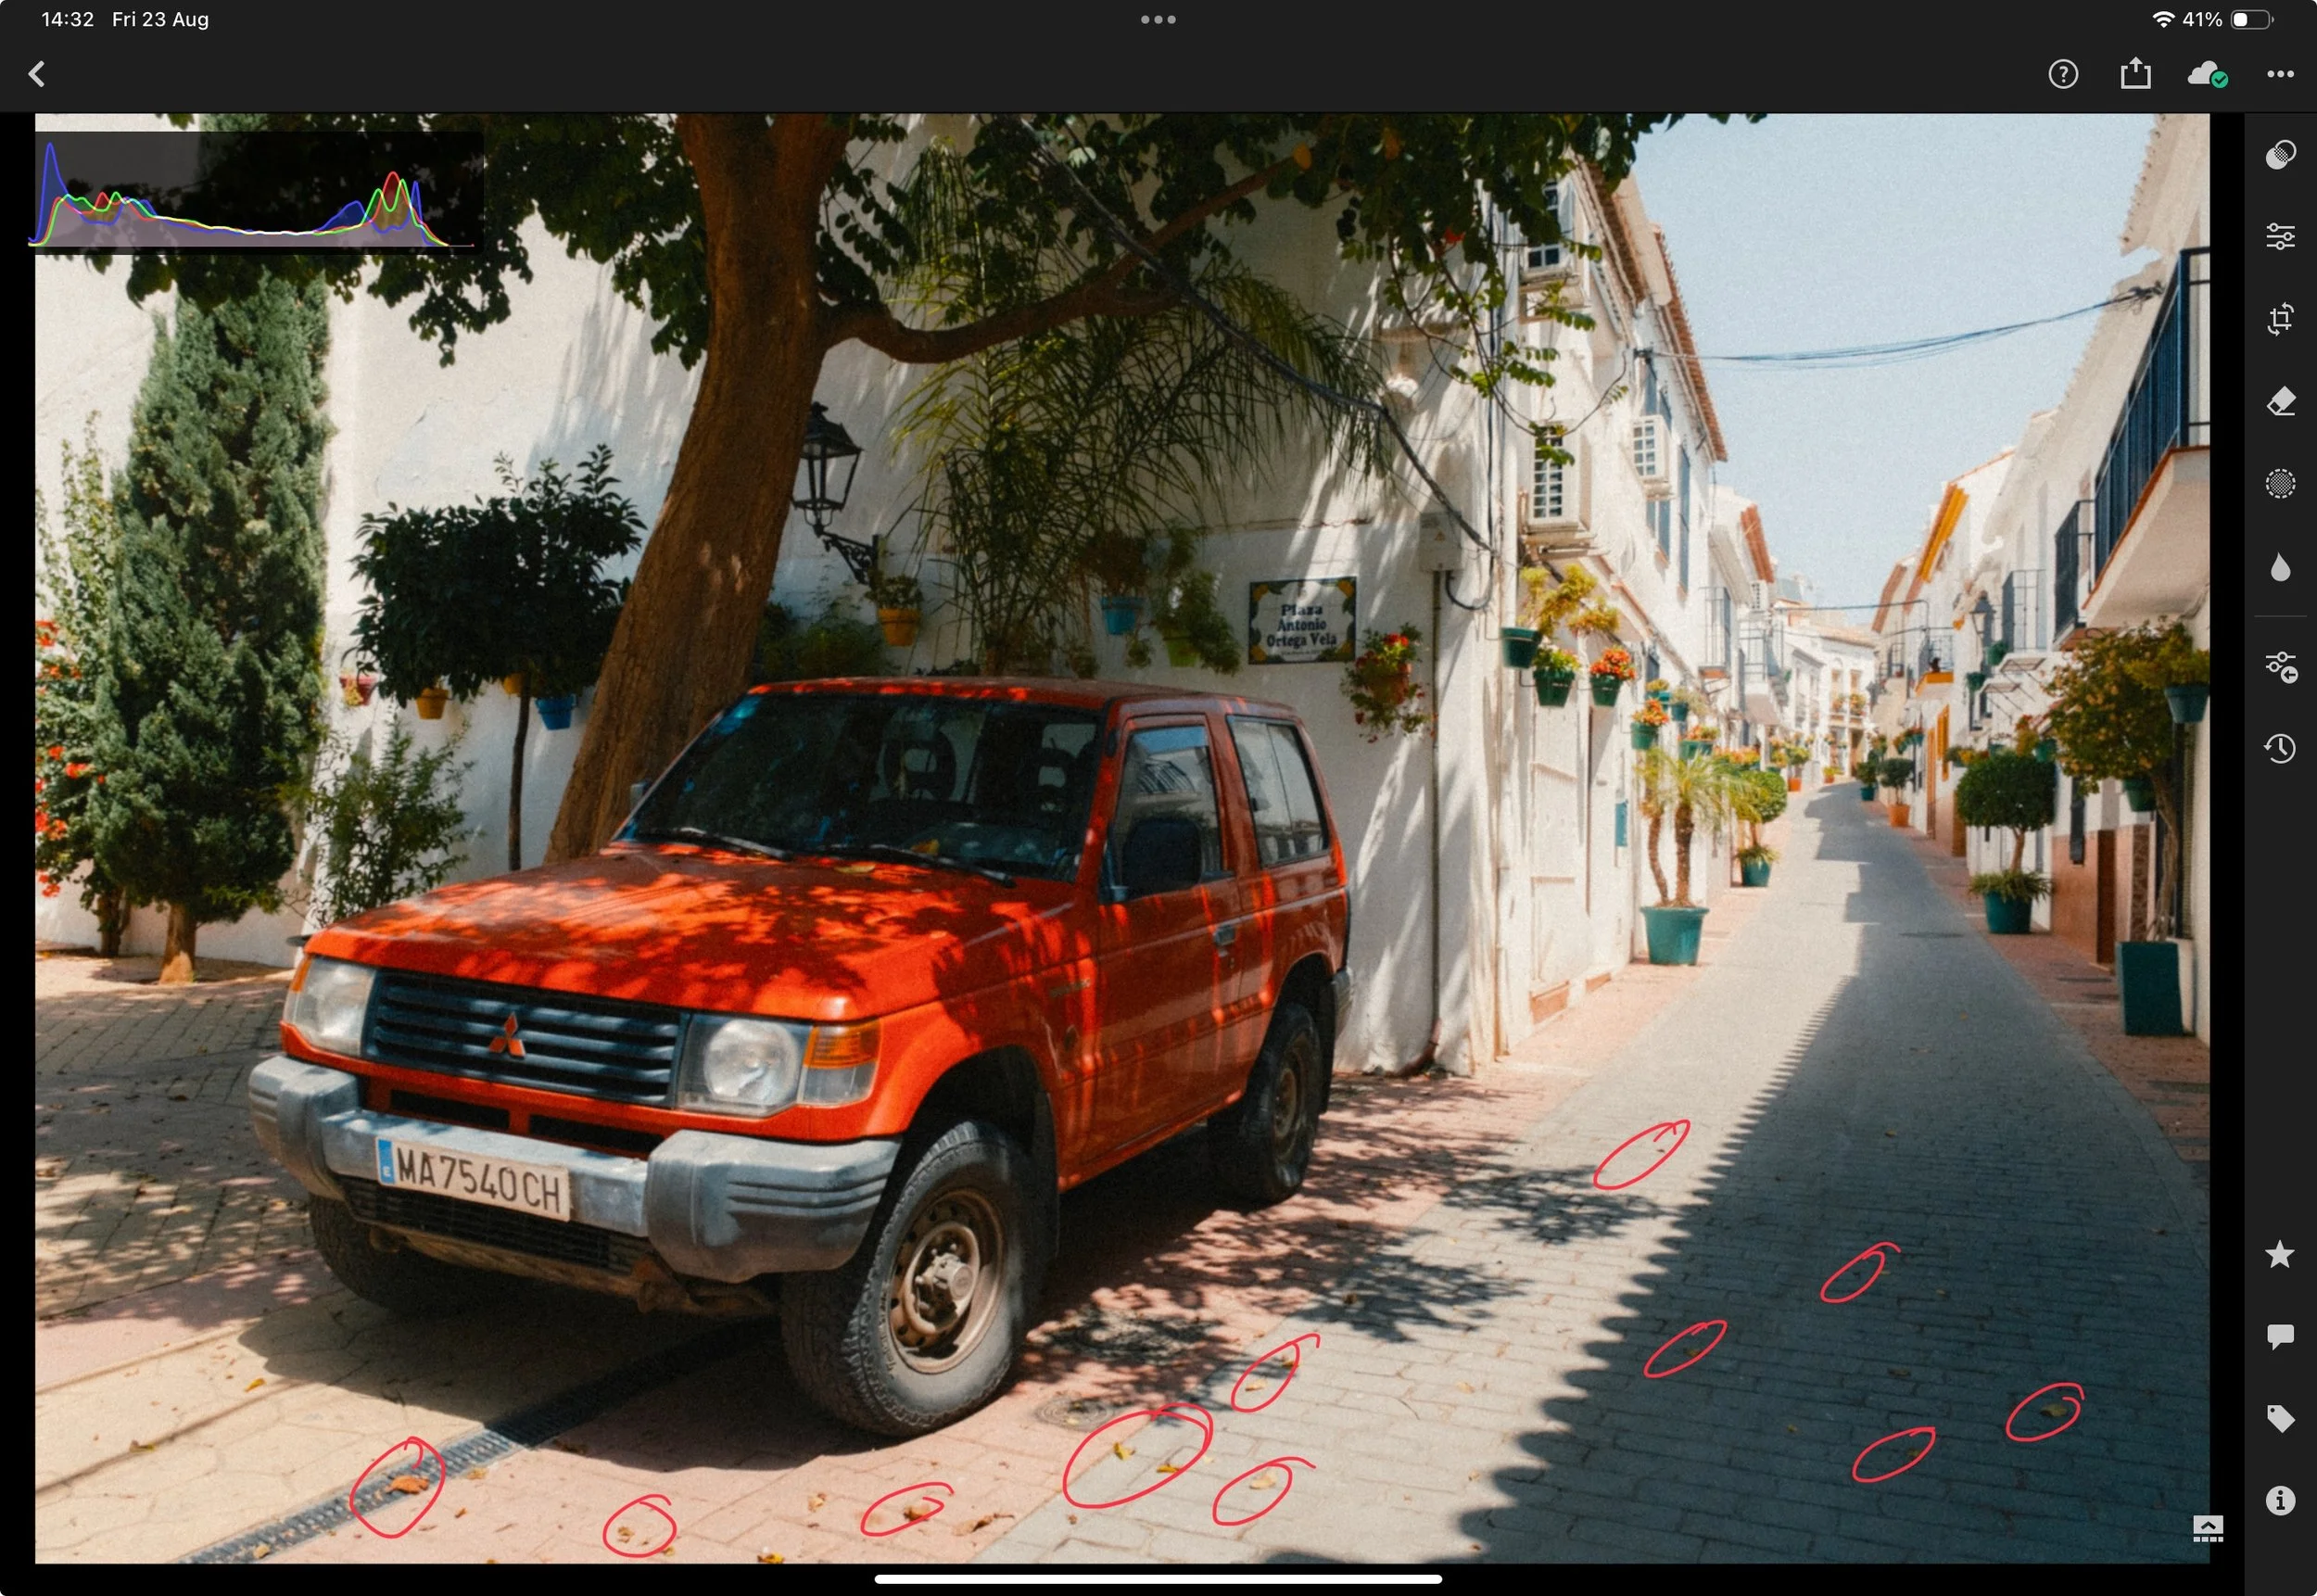
There is, of course, a broader debate on whether this is considered cheating. My personal opinion is that it depends on the purpose of the image. If you’re documenting an event or a location and authenticity is of the utmost importance, then I wouldn’t do this. However, if you’re shooting with an artistic approach—perhaps to sell the photos as prints or simply to create beautiful images—then there’s nothing wrong with it at all.


If you found this blog helpful and wish to learn more about photography & travel while having direct access to me, please consider joining my Patreon community.














Instead of telling you how these will change your life, I would rather be practical and answer the most common questions that people tend to have when buying presets.
What are presets?
They are editing settings that are saved in a file and can be applied to any image.
Why do people buy presets?
Sometimes because they like the work of the photographer and want that style for their own photos. Mostly because they would like to see how other people edit and learn by reverse engineering the presets. Other times it’s just to support their favourite photographers, thank you!
What’s the overall style of these presets?
- Filmic
- Warm
- Soft
- Bright
What are these presets suitable for?
Street & Travel Photography
Some Nature (with further editing)
Some Portraits (with extensive editing)
Do I actually use these?
Yes. This is the same pack I use right now for all my editing. This isn’t a pack made just to sell.
Do these presets get updated?
Yes, as my style changes, these presets will also be updated. Any time a new update is available, you will get a free update via email. Of course you also keep all the old presets in case you prefer the older looks. Only presets purchased from 2025 onwards will receive the updates.
What file types are these presets for?
- All RAW files
- JPEGs & TIFFs (not recommended)
What camera brands are these presets for?
These were designed around Fujifilm, Sony, and Leica sensors. With that said, they will work with all camera brands. While there might be differences due to individual camera colour science, the overall feel of the preset will carry over.
Will these work with JPEG files?
Yes, but you will need to reduce the intensity and make further edits. I strongly recommend editing RAW files.
Are these one click edits?
95% No. You would need to do some basic adjustments as each image is different. These adjustments can include exposure, colour balance etc. In 5% of cases you can just apply and leave it alone.
Do I need to know how to edit?
You need to have a basic understanding of adjusting exposure, highlights, shadows, etc. A more comprehensive editing skillset will let you get the most out of them.
How many presets are included?
10 in the main pack and 24 in the extras pack
Why two packs?
The main pack is what I use for 99% of my edits and is kept small to reduce wasted time scrolling through presets. The extras pack is everything I don’t use often.
What software do I need?
These presets will work with any of the following:
- Photoshop (adobe camera raw)
- Lightroom Classic
- Lightroom Desktop
- Lightroom Mobile
Will these presets work with free versions of the above software?
You need to research and double check before buying. These presets were designed for the full paid versions.
Will these presets work with very old versions of the above software?
You need to research and double check before buying. These presets were designed on and for the latest software.
What file type do I get?
XMP
What else do I get?
- Comprehensive PDF guide
Can I modify these and turn them into my own?
Yes! In fact I encourage you to modify them and play around. Use these to help you get your own style.
I have more questions…. What do I do?
Make a cup of tea and drop me an email on hello@snapsbyfox.com
Please note that due to the nature of digital products, refunds are generally not accepted. However, if you experience any issues, feel free to contact me and I’ll review your situation individually. You are welcome to use this product for personal or commercial projects, but you may not copy, distribute, or resell the files in their original or modified form.
Finally I want to say a massive thank you for supporting me. Buying these presets is the most direct way you can support my work.
Thank you!