
The Correct Fujifilm X100VI Settings
I’ve been using the Fuji X100VI for around 6 months, got some great shots with it, and while I’m not yet ready to give you a full, detailed review, I can share what settings I use for my day-to-day photography. If you find this information useful and want an in-depth guide to the Fuji X100VI, then may I suggest picking up a copy of my X100VI Camera Guide? It will help you get the most out of your Fuji while also supporting this ad-free blog.

This Fujifilm X100VI set-up guide is designed to save you time and get your camera set up and working just like I do. You will learn what the major features do and why I chose to set them in a certain way. I will show you how to assign the buttons and custom menus in order to have the most important features at your fingertips. Finally, I will walk you through how I expose and focus.
This guide is not a replacement for your user manual and does not cover 100% of the features. It covers the features that, in my experience, 90% of the people use 90% of the time. This is based on years of personal experience.
This guide is best suited for those who want to be up and running quickly with a tried-and-tested set-up.
This is a digital download and not a physical product. The download is around 24mb.
Please note that due to the nature of digital products, refunds are generally not accepted. However, if you experience any issues, feel free to contact me and I’ll review your situation individually. You are welcome to use this product for personal or commercial projects, but you may not copy, distribute, or resell the files in their original or modified form.
Finally, I want to say a massive thank you for supporting me. Buying this guide is the most direct way you can support my work, thus allowing me to make more videos, photos, and tutorials for you.
Thank you for your support!
Button & Dial Set Up
The first thing is to set up the custom buttons and dials. Having your go-to features available instantly can mean the difference between getting or missing the shot.

Fn1 - Spot Metering Lock
I use this to expose for the highlights and create a high-contrast look.

Fn2 - ND Filter
I use this if I want to slow the shutter down and create motion blur or shoot wide open in harsh light.

AEL/AFL - Lock Exposure & Focus
I leave this as default. It allows me to lock the camera and re-compose.

R-Dial - Auto ISO
I use this to change between three Auto ISO presets.

Selector - Face Detect On/Off
I use this to turn Face Detect On/Off.

Q
I leave this as default for the Quick Menu.

Photography Mode
I almost always shoot in aperture priority mode. I set the aperture, and the camera does the rest. Sometimes I will switch to shutter priority if I want to slow things down, but it’s not often. Aperture priority can change the whole narrative of the photo by changing the depth of field. Also, it’s a quick way to either block or let more light into the camera. Although you can use shutter priority to convey motion, I found aperture priority to have a bigger impact on the perception of the photo (unless all your shots have motion blur).

Burst vs Single Shot
Some people swear by single-shot mode as they want to time it themselves. Personally, I don’t care for that, and I’d rather get the shot than practice my reflex skills. I tend to leave the camera in CL, the low burst mode. I use 5fps as it’s slow enough to only take one shot (if you lift your finger fast enough), yet it’s fast enough to get a good selection of shots for you to pick from later.

RAW vs JPEG
Fuji cameras have a loyal JPEG fan base, and while I tried them for a while, I find shooting raw is better for me. I hate the idea of having a pre-determined look that I can’t change later. This is very personal, and many people hate editing, but for me, it’s raw or nothing. If you’re unsure, select Fine + RAW and have the best of both worlds. I also have a free blog on my most used JPEG recipes here.

Aperture Values
I always start in f4 as I find it to be a nice balance of all the elements. There is enough separation to give depth, yet not so much that it looks silly. You also have the ability to quickly open or close the lens, thus adjusting how much light comes in. Finally, you can change the narrative of the photo by blowing the background out of focus at f2 or having everything in focus at anywhere between f8 and f11. Start in f4, then see how it goes.

Auto ISO Set Up
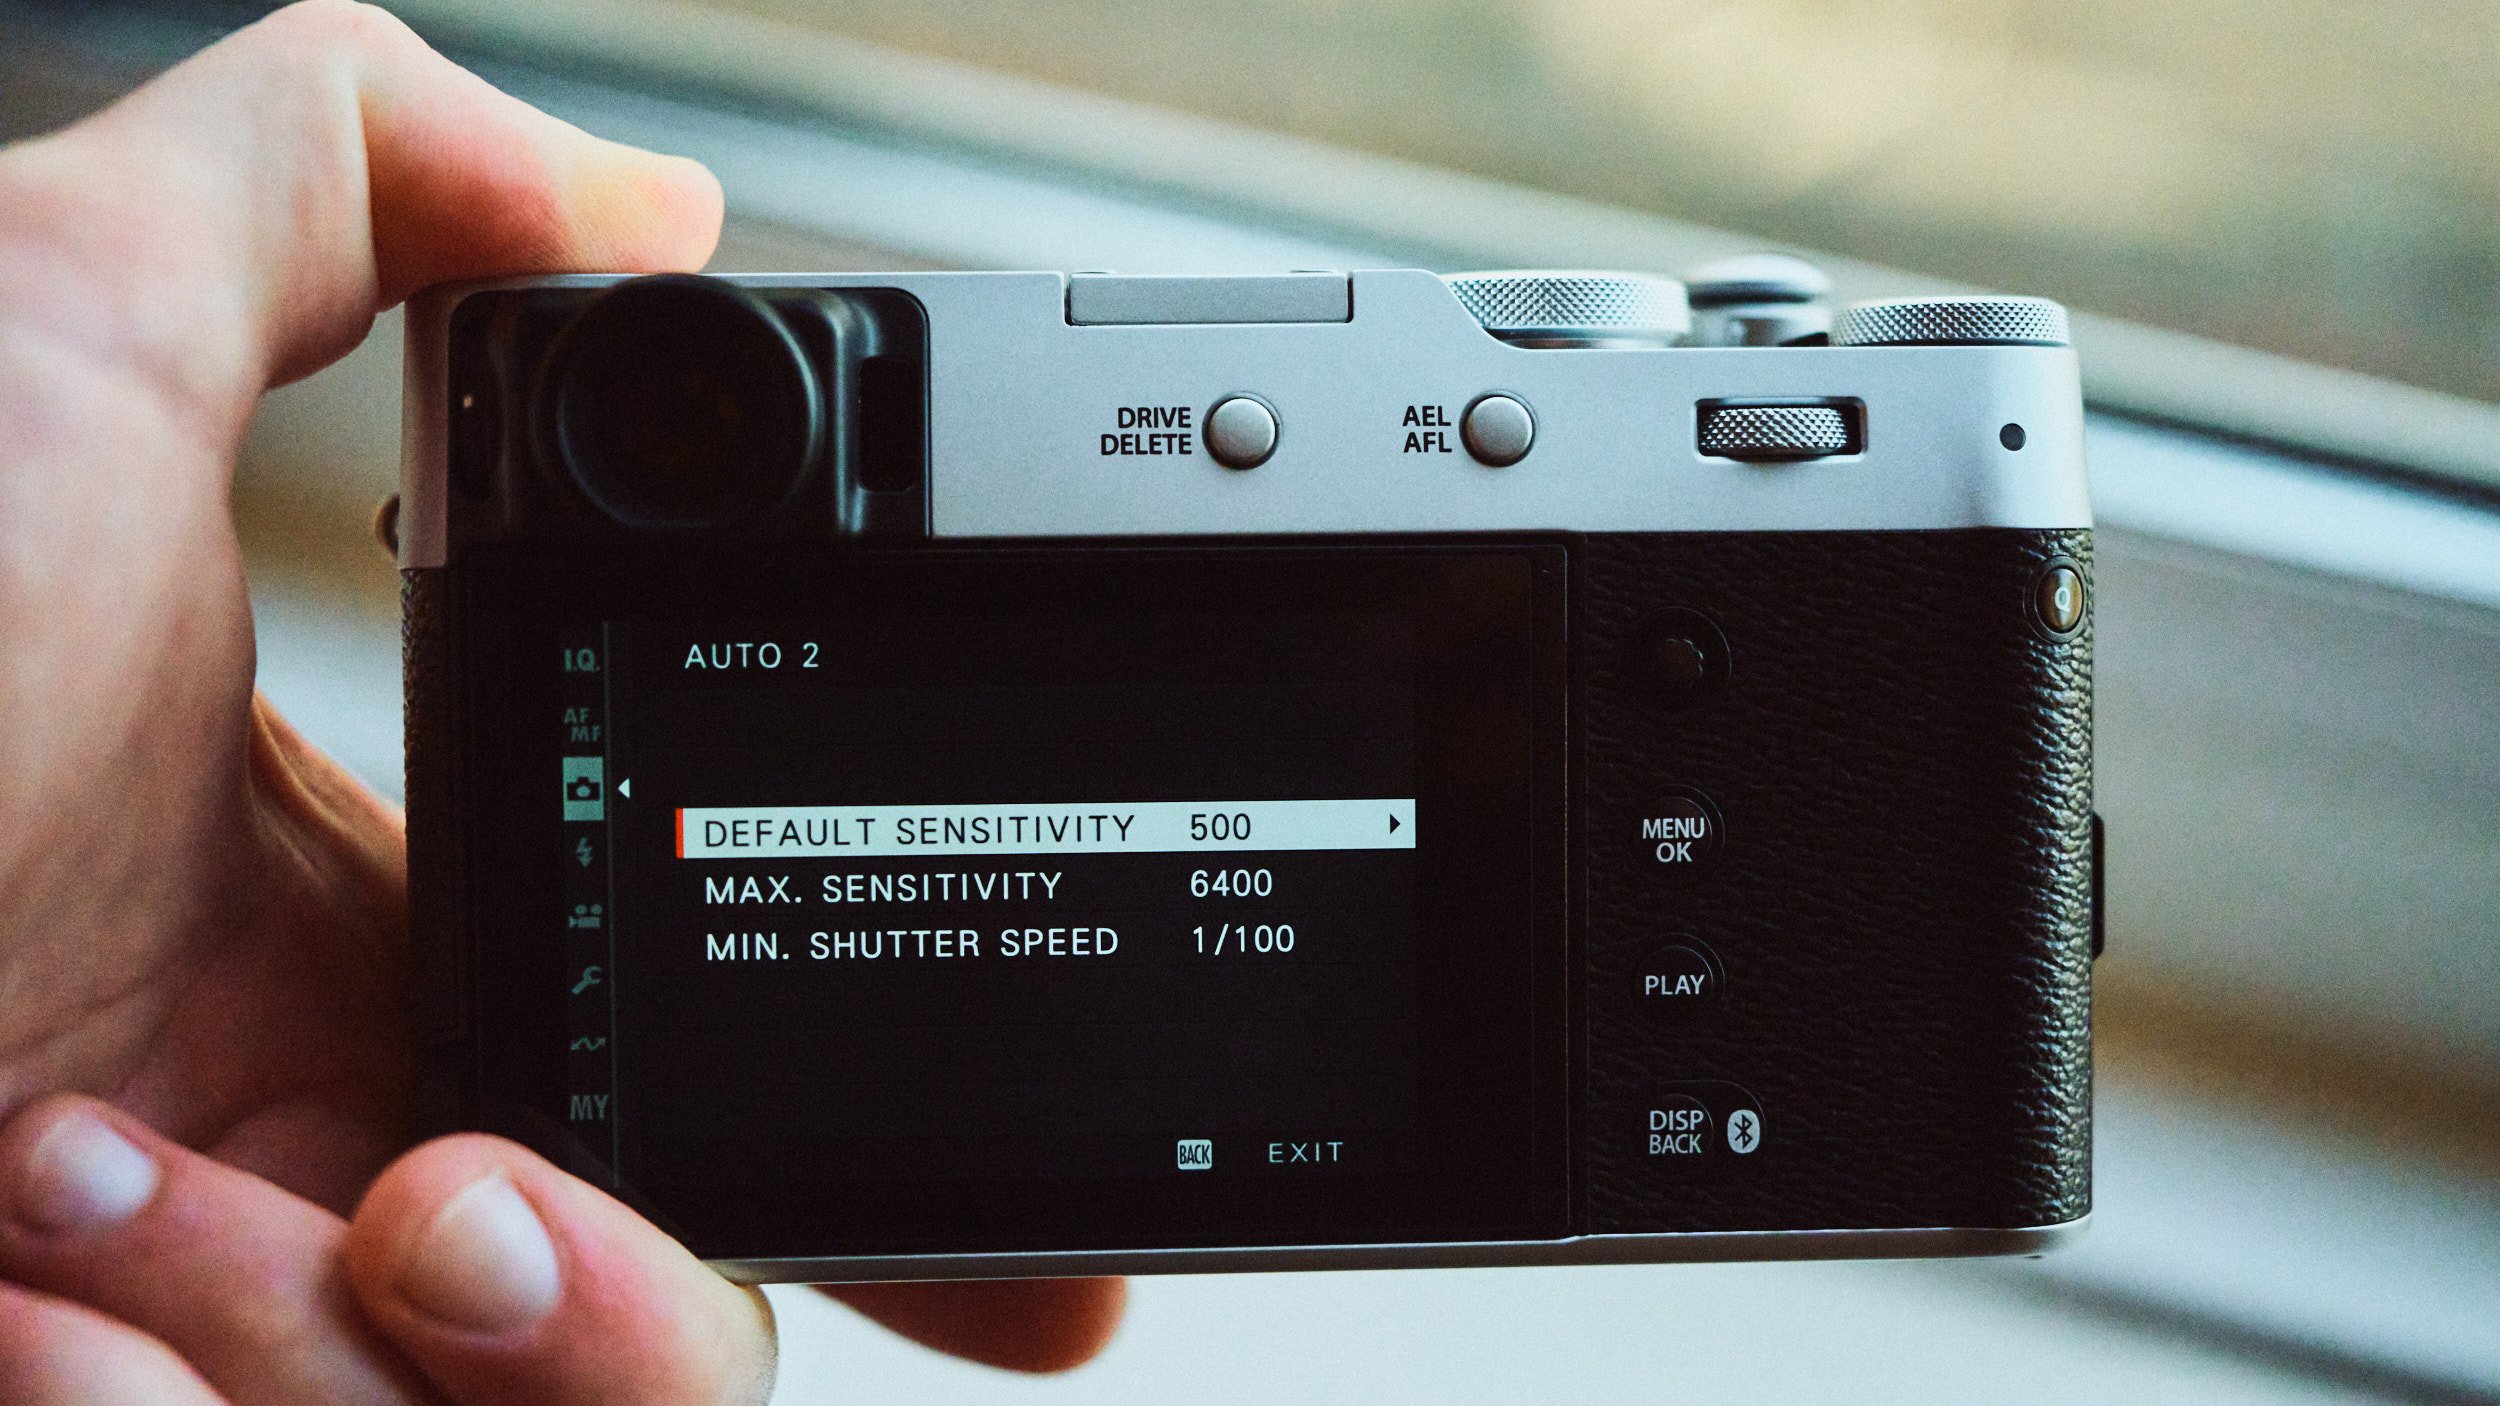
This is critical because the wrong settings will literally ruin your photos. This setting allows you to set the minimum and maximum levels for ISO as well as minimum shutter speed. Go into Auto ISO 1, and the first thing you want to do is change minimum shutter speed from Auto to 200. If you ever took a photo and wandered why it was blurry, this is most likely the culprit. Set this up as follows:
Auto ISO 1 - Daytime
Min Shutter - 1/200
Min ISO - 125
Max ISO - 6400

Auto ISO 2 - Night
Min Shutter - 1/100
Min ISO - 500
Max ISO - 6400
Auto ISO 3 - High Shutter Priority
Min Shutter - 1/500
Min ISO - 1000
Max ISO - 12800

Global Compensation
You can use the exposure compensation to adjust the overall exposure level. There are no hard rules here, and if you shoot using some JPEG profiles, they might even require you to adjust this. Below is how I adjust it, but your mileage may vary.
Sunny Day (high contrast) - 0 to (-0.3)
Sunny Day (flat light) - 0 to (+0.3)
Cloudy Day - (+0.3)
Fog & Snow - (+0.6) to (+1)
Night - (-0.6) to (-1.6)

Photometry
Once you’ve set global exposure, you need to tell the camera what to expose for. I use three modes.

Multi - The camera exposes for the entire scene and tries to strike the right balance. Great for most photography.

Centre - The camera exposes for only the middle portion of the frame. Great for shooting out of windows or through frames.

Spot - The camera exposes on where the spot is. Great for creating that high-contrast highlight and shadow look.

Focusing Mode
I only use two modes. The first is single point and single autofocus mode. The focus system will only acquire focus once, then lock. The focus will only be acquired on where the square is. This is good for static subjects, scenes, and general snapshots.


The second mode combines zone mode with continuous autofocus. Zone is where you have a collection of single points within a larger area. Continuous autofocus will constantly track and keep whatever the focus point is on, in focus. I use this whenever myself or my subjects are moving. Single point is accurate but slow. Zone is less accurate but fast.















Instead of telling you how these will change your life, I would rather be practical and answer the most common questions that people tend to have when buying presets.
What are presets?
They are editing settings that are saved in a file and can be applied to any image.
Why do people buy presets?
Sometimes because they like the work of the photographer and want that style for their own photos. Mostly because they would like to see how other people edit and learn by reverse engineering the presets. Other times it’s just to support their favourite photographers, thank you!
What’s the overall style of these presets?
- Filmic
- Warm
- Soft
- Bright
What are these presets suitable for?
Street & Travel Photography
Some Nature (with further editing)
Some Portraits (with extensive editing)
Do I actually use these?
Yes. This is the same pack I use right now for all my editing. This isn’t a pack made just to sell.
Do these presets get updated?
Yes, as my style changes, these presets will also be updated. Any time a new update is available, you will get a free update via email. Of course you also keep all the old presets in case you prefer the older looks. Only presets purchased from 2025 onwards will receive the updates.
What file types are these presets for?
- All RAW files
- JPEGs & TIFFs (not recommended)
What camera brands are these presets for?
These were designed around Fujifilm, Sony, and Leica sensors. With that said, they will work with all camera brands. While there might be differences due to individual camera colour science, the overall feel of the preset will carry over.
Will these work with JPEG files?
Yes, but you will need to reduce the intensity and make further edits. I strongly recommend editing RAW files.
Are these one click edits?
95% No. You would need to do some basic adjustments as each image is different. These adjustments can include exposure, colour balance etc. In 5% of cases you can just apply and leave it alone.
Do I need to know how to edit?
You need to have a basic understanding of adjusting exposure, highlights, shadows, etc. A more comprehensive editing skillset will let you get the most out of them.
How many presets are included?
10 in the main pack and 24 in the extras pack
Why two packs?
The main pack is what I use for 99% of my edits and is kept small to reduce wasted time scrolling through presets. The extras pack is everything I don’t use often.
What software do I need?
These presets will work with any of the following:
- Photoshop (adobe camera raw)
- Lightroom Classic
- Lightroom Desktop
- Lightroom Mobile
Will these presets work with free versions of the above software?
You need to research and double check before buying. These presets were designed for the full paid versions.
Will these presets work with very old versions of the above software?
You need to research and double check before buying. These presets were designed on and for the latest software.
What file type do I get?
XMP
What else do I get?
- Comprehensive PDF guide
Can I modify these and turn them into my own?
Yes! In fact I encourage you to modify them and play around. Use these to help you get your own style.
I have more questions…. What do I do?
Make a cup of tea and drop me an email on hello@snapsbyfox.com
Please note that due to the nature of digital products, refunds are generally not accepted. However, if you experience any issues, feel free to contact me and I’ll review your situation individually. You are welcome to use this product for personal or commercial projects, but you may not copy, distribute, or resell the files in their original or modified form.
Finally I want to say a massive thank you for supporting me. Buying these presets is the most direct way you can support my work.
Thank you!